Stop Streaming, Start Listening: A Bit-Perfect Audio Setup with Raspberry Pi & Free Software
Snehith | from Tech · Lifestlye | 6 min read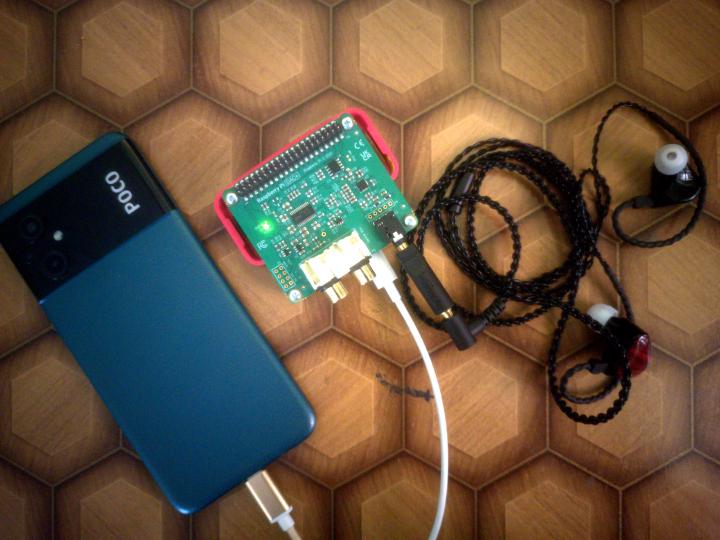
These days, we are unfortunate not to have easy access to High-Quality music—in a technical way, not an artistic one. This is thanks (or no thanks) to streaming services like Spotify and YouTube Music. They serve you compressed, lossy audio files, which is understandable since there are real limitations on network bandwidth and the cost of storage versus the revenue made by lossless streaming. It’s possible, sure, but not very economical for them.
But we need music in its full glory. As I explained in my article—What good is Music if it tells you what you Already know?—listening matters. To learn more about how lossy music works and what constitutes lossless audio, you can check these links for bit depth and Audio compression.
Getting a full, clean audio experience requires three things to make up the stack:
- A Clean Audio Stack: One that dumps raw data directly to the hardware without interference.
- Capable Hardware: To output audio modulations as perfectly as possible.
- High-Resolution Audio: Preferably 16-bit or 24-bit (and above), also known as CD or DVD quality.
Of course, a bit-perfect player needs high-quality sources. To build your library, I recommend buying DRM-free lossless files from Bandcamp or Qobuz, or ripping your old CD collection to FLAC. This ensures you actually own your music—no subscriptions, no revoked licenses. – You can torrent them too at your risk!
For this, I wanted a setup that is clear, modular, and—most importantly—portable.
- Clean: I want to verify how it works and have a clear picture of the internals rather than just trusting an OEM’s word for it.
- Portable: A setup that stays lean, runs on low power, and can be tucked away anywhere.
After some research, I found that the Raspberry Pi Zero 2 W is a perfect low-cost SBC for this. It runs Linux, and the best part is the official Rpi DAC+. It outputs full High-Definition 24-bit/192kHz audio using the Texas Instruments PCM5122 codec—a highly respected DAC in the audiophile community.
You can buy them from official partners. I got mine from robu.in. You can find sellers available for you at the Raspberry Pi Zero 2 W and Raspberry Pi DAC+ product pages.
Let’s put them together & setup MPD for Bit-Perfect playback.
Since we are running ‘Headless’ (no monitor), your Raspberry Pi becomes a silent, invisible server. You won’t need to touch it once it’s configured; it just lives in your pocket or bag, doing one thing and doing it perfectly.
Install the Raspberry Pi Imager. For this project, I suggest installing Raspberry Pi OS Lite only. We don’t need a desktop environment, mouse, or keyboard—this is a portable setup, so we do SSH ;-)
The setup looks something like this:
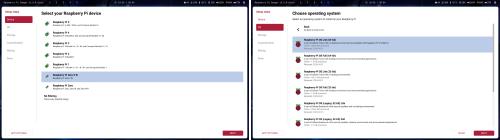
Once the install is done, insert the card and let it initialize. If you can do the pre-install configuration for Wi-Fi in the Imager, that’s great. Otherwise, you might need a screen and keyboard just once to set up the Wi-Fi from your mobile hotspot. Setting it up with your mobile gives you remote control over the device via SSH and playback control via M.A.L.P (since we’re going for a portable setup). I prefer F-Droid apps & Termux for both.
Buy the Zero 2 W with pre-soldered header pins to avoid the hassle of soldering! Simply insert the DAC into the Pi using the GPIO pins. There is no need to worry about drivers, as Pi OS handles auto-detection.
Small config change required for the hardware (Optional)
Edit your config at /boot/firmware/config.txt. It should look like this:
dtoverlay=dwc2
#dtparam=audio=on
camera_auto_detect=1
display_auto_detect=1
auto_initramfs=1
dtoverlay=vc4-kms-v3d,noaudio
max_framebuffers=2
disable_fw_kms_setup=1
arm_64bit=1
disable_overscan=1
arm_boost=1
[cm4]
otg_mode=1
[cm5]
dtoverlay=dwc2,dr_mode=host
[all]
enable_uart=1
By using the noaudio flag and commenting out the default dtparam=audio=on, we tell the Linux kernel to ignore the Pi’s low-quality onboard PWM audio. This forces the system to treat our high-end DAC as the primary and only ‘voice’ of the device, eliminating any hardware-level confusion.
This ensures your audio stack only uses the ‘Raspberry Pi DAC+ HiFi pcm512x-hifi-0’ as your audio card.
Software setup - The magic you can do
The other half of the setup is just putting the software together. From here on, we configure the system. On startup, you will likely log in automatically; if not, do so manually. Then, update the system:
sudo apt update && sudo apt upgrade -y
Install only the essentials to keep the machine lean and power efficient:
sudo apt install mpd mpc ncmpcpp -y
Don’t let the command line scare you—ncmpcpp is what we call a TUI (Terminal User Interface). It’s incredibly lightweight and gives you a ‘Matrix-chic’ aesthetic that looks way cooler than any modern streaming app while using almost zero system resources.
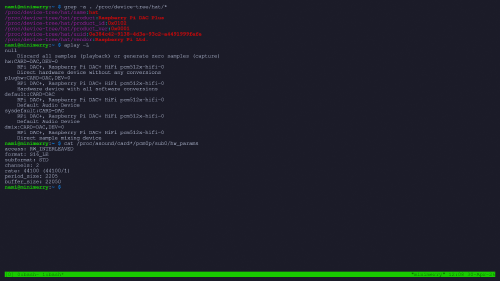
Check board detection by entering: grep -a . /proc/device-tree/hat/*
You’ll see something like this:
I (and many fellow audio enthusiasts) consider MPD (Music Player Daemon) the gold standard for audio playback on Linux.
Edit your /etc/mpd.conf:
music_directory         "/home/nami/remmy_media"
playlist_directory      "/var/lib/mpd/playlists"
db_file                 "/var/lib/mpd/tag_cache"
state_file              "/var/lib/mpd/state"
sticker_file            "/var/lib/mpd/sticker.sql"
user                    "mpd"
bind_to_address         "0.0.0.0"
bind_to_address         "/home/nami/mpd.sock"
port                    "6600"
restore_paused          "yes"
auto_update             "yes"
audio_output {
        type            "alsa"
        name            "Pi-DAC+ Pure"
        device          "hw:CARD=DAC,DEV=0"
        mixer_type      "hardware"
        mixer_control   "Digital"
        auto_resample   "no"
        auto_format     "no"
        auto_channels   "no"
        buffer_time     "500000"
        period_time     "50840"
}
replaygain              "off"
volume_normalization    "no"
input {
        plugin "curl"
}
decoder {
        plugin          "hybrid_dsd"
        enabled         "no"
}
audio_buffer_size "16384"
max_output_buffer_size "32768"
By setting the auto parameters to no, we ensure MPD delivers the raw bits directly to the hardware without resampling.
Enable the systemd service for MPD:
sudo systemctl enable --now mpd
Open ncmpcpp and press 2, navigate to your music, and play a track. You can verify it is working with mpc status.
To confirm the high-quality, bit-perfect output, type:
cat /proc/asound/card*/pcm0p/sub0/hw_params
You should see output indicating the bit depth and sample rate match your source file perfectly.
If everything worked—Great! You have successfully created an audiophile setup from start to finish.
Get some high-quality music and Rsync them from your PC or via Termux.
I use my Phone as power source while commute, from OTG (Charge device settings) to PI’s power plug and Use TRUTHEAR x Crinacle ZERO:RED In-ear Monitor for its price to performance (audio-response) it has a flat like profile and sounds punch and crisp! its a joy doing the work and enjoying music like a pro, hahaha!
Quick tip: Powering a Pi + DAC from a phone pulls some juice. For long trips, a slim 5000mAh power bank is a great external battery to save your phone’s life.
Happy listening.